Feeling freezing in winter despite having a fireplace and burning up in summer even with the AC? The blame is a lack of insulation. Those who paid attention to high school physics and thermodynamics might know the importance of insulation. One of the main laws of thermodynamics is that heat will always expand toward cooler spaces. Therefore, through winter, heat will escape to cooler outdoors, while in summer, the outside heat will find its way in.
Proper insulation reduces the flow of heat movement through walls and roofs by creating an additional barrier between the inside and outside of your home. Blown-in cellulose insulation is a type of insulation suitable for property owners who require additional insulation on their property. This type of insulation is ideal for those who want to add insulation to their existing walls, attics, or crawlspaces.
Read on to gain a full understanding of how to install blown-in cellulose insulation, how it works, and what its advantages and disadvantages are.
What’s blown-in cellulose insulation?
Blown-in cellulose insulation is a type of insulation used in residential and commercial properties, made from any cellular plant source. It’s typically composed of wood and specific recycled paper products, such as newspaper, office paper, cardboard, etc.
The insulation is dense and clumpy, consisting of thousands of recycled cellulose pieces, and can properly fit into enclosed areas and conform to ductwork, pipes, and anywhere in your home that requires insulation.
How to install blown-in cellulose insulation in walls?
It’s typically blown into walls or attic. Loose-fill is one of the most common types, designed to be blown through holes frilled in plaster or drywall via blown-into attics or blower nozzles to properly fit uninsulated joist cavities.
The process is pretty simple, so many homeowners can do it and save money on installation costs. Here are the basic steps to DIY cellulose insulation in walls:
Step 1. Create an airtight seal
The first step is to seal any gaps around plumbing, perforations, ceiling, and electrical wire holes using caulk for small holes and expanding spray foam for larger ones. Make sure both spray foam and caulk are fire-resistance.
Step 2. Drill Holes in walls
When insulating walls, it’s crucial to drill holes in your wall for the blower nozzle. Begin by using a stud finder to mark and locate the studs in your walls. Then use a hole saw to drill small holes, measuring two or three inches wide, between the stud and near the top of the wall. To re-patching the holes easier, hold onto the cut-out section.
Step 3. Prepare the insulation and blower
The next step for the installation of blown-in cellulose installation is to prepare the insulation and set up the blower.
Although the blower machine has rotating teeth to chop and fluff the cellulose for blowing, it is advisable to pre-crumble the cellulose before placing it in the hopper to prevent clogging of the hose during installation.
Set up the blower machine near the project area to minimize the distance you need to run the blower hose. If you need to run hoses through your home, it’s a good idea to place a tarp or scrap towels under the hoses to protect your carpets or floors.
Step 4. Blown in the insulation
You need assistance for blowing in the insulation to turn on/off and feed cellulose into the blower.
To work on the walls, put the blower hose into the first hole and direct the nozzle down into the wall. Wrap a rag or t-shirt around the hole in the wall to form a seal and ensure proper insulation. You can tell when each section of the wall is complete when you feel resistance and the blower machine cannot blow any more insulation.
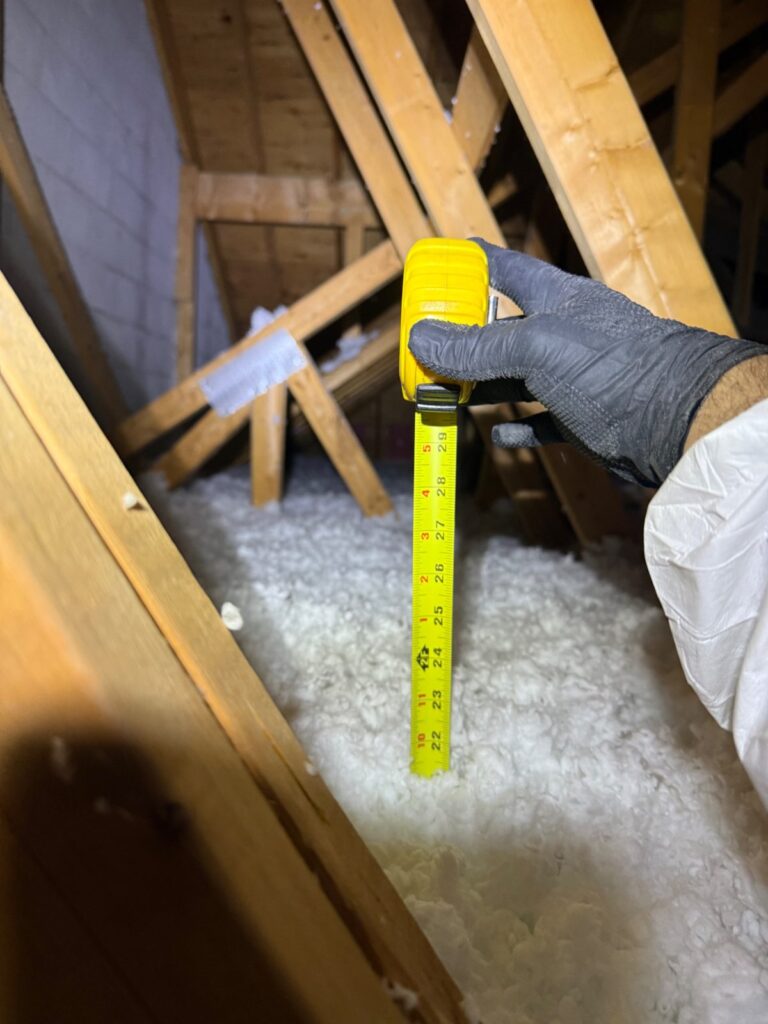
If you’re keen to know how to install cellulose insulation in attic, you’ll need to mark your desired level of insulation with a tape measure and a sharpie, marking along walls or trusses of your attic. As blowing insulation can be dusty and hard to see, mark multiple areas to make sure setting an even coverage.
Position yourself centrally during the installation of blow-in cellulose insulation in the attic, it helps you achieve an even spread throughout the space. It’s a good idea to start at the farthest point from the attic entrance to prevent blocking yourself.
To cover one section of the attic at a time, use a slow and steady sweeping motion. Work your way around the attic using this technique.
Some notable advice
Whether you’re blowing in the attic or walls, wear protective equipment, such as eye protection, a long-sleeve shirt & gloves, a heavy-duty dust mask or particulate respirator.
The Benefits of Blow-in Cellulose Insulation
Properly fitting and conforming around to any sharp or obstruction in your attic or walls is the major benefit of blown-in cellulose insulation.
Loose-fill insulation is one of the best and most cost-effective ways to add insulation to already-finished walls without fully removing drywall.
In fact, blown-in cellulose insulation in existing walls is affordable compared to other kinds of insulation. Despite its relatively low cost, it provides a significantly high R-value. The R-value is a measure of the insulating power, with a higher R-value indicating better insulation.
Because blown-in cellulose insulation is made of recycled paper and wood, it’s the best eco-friendly alternative to fiberglass or other types of insulation, meaning it meets most of the green building certification standards.
Disadvantages of Blown-In Cellulose Insulation
In fact, the ability of blown-in cellulose insulation to settle into any sharp area can be a disadvantage as it can pack down easier than other types of insulations. If insulation settles or becomes compacted, it might create gaps at the top of surfaces or reduce its overall effectiveness.
Another disadvantage is that it can easily soak up moisture in the enclosed area and takes a pretty long time to dry, which may lead to mold and mildew problems. Additionally, wet insulation has a significantly lower R-value, meaning less effective. Therefore, this type of insulation cannot be suitable for moisture-filled climates and improperly sealed spaces.
The pros and cons of blown-in insulation in one look
| pros | cons |
| An ability to conform around any area and shape | Pack down easily which may leave gaps |
| Cost-effective | Moisture – absorb |
| Eco-friendly | In-wall pipe leaks may require complete re-insulation |
Blown-In Cellulose Insulation VS Other Types of Insulation
Blown-in cellulose insulation is one of the few options for insulating already-closed-off walls without the need for complete remodeling. Even though it involves patching and painting, installing blown-in cellulose insulation is much simpler than completely removing drywall to install roll or batt insulation.
For unfinished walls, other forms of insulation are preferable, such as fiberglass roll insulation or fiberglass batts.
When it comes to attic insulation, blown-in cellulose insulation seems the ideal choice because it can easily reach difficult areas and effectively cover obstructions commonly found in ceilings or other areas.
Our recommendation is to pair batt insulation with blown-in insulation in attics to create a more effective insulated barrier for your home.
FAQ
How much is cellulose insulation?
Blown-in cellulose insulation cost ranges from $0.60 to $2.20 per sq. ft, depending on the quality and brand. However, the pricing may vary depending on your region. Additionally, the insulation company may charge an hourly rate for moving items in your attic to complete the job properly.
How to install cellulose insulation in attic?
There are some steps for installation:
- Create a barrier around fixtures
- Load up the blowing machine
- Turn on the blowing machine and spray
- Level up the insulation
- Vacuum any remaining insulation
Which is better fiberglass or cellulose blown-in insulation?
Blown-in cellulose insulation has a higher R-value compared to fiberglass, which means it can prevent heat transfer and air lockage more effectively. Therefore, cellulose insulation can better keep your home warm during winter and cool it through summer, resulting in considerable savings on energy bills.
Bottom Line
Blown-in cellulose insulation is one of the best options for insulating your home, particularly for re-insulating or adding insulation to an existing home. It’s a cost-effective and eco-friendly & easy-to-use material with a high R-value, making it ideal for hard-to-reach areas and fitting around in-wall instructions.
If you’re looking for a reputable contractor to install cellulose insulation in your home, contact us at Confirmed Corp Co. We are always ready to help you.